The information in this article will guide you to all you need to know on how to add a user to a group on Linux with ease as it has been explained in a way that makes for easy understanding.
You can add users to groups in Linux with the usermod command. If this is something you want to do, you should know that you have to specify the -a -G flags. They must be followed by the name and username of the group to which you want to add the user.
A Linux group is a collection of users that defines shared permissions for those users. If you have been pondering on figuring out how you can add a user to a group on Linux, then you have come to the right place.
We at Stay Informed Group are committed to providing educative content that will help with education technology, etc., to help individuals solve problems.
In this guide, we will cover how to add users to groups in Linux. We give an example of adding an existing user to a group. We also discuss adding new users to the group.
What are Linux Groups?
Groups on Linux are platforms dedicated to helping developers manage user accounts in Linux. You can assign unique access rights to each user. However, this may not be practical if you are working with multiple users who need the same permissions.
Groups allow you to define which users can read, write, or execute certain resources on your Linux system. For example, we can specify the “/home/stayinformedgroup/tutorials” folder on the server can only be accessed by individuals who are members of the “StayInformedGroup” on Linux.
There are two types of Linux groups:
- Primary group: This is not different from your login name and is the primary group your user belongs to. Your files cannot be shared with other group members on a Linux System or Computer.
- Secondary group: Secondary groups are groups in Linux computer that allow you to share access to files, it can also be called supplementary group
To add a user to a group, use the Linux sudo command. This is because adding a user to a group changes their file permissions.
Now that we understand the basics of groups in Linux systems, let’s see how to add users to groups.
How to Add Users to Linux Groups
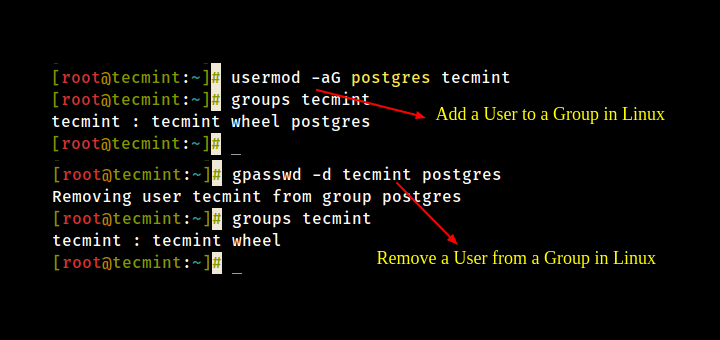
You can use the usermod command to add users to Linux groups. The -a -G flags is what you will use if you are adding an existing user account to the group. usermod -a -G groupname username is the syntax of the usermod command as written below.
sudo usermod -a -G group_to_add username
You can further break down the syntax command as written below:
- The -a flag is something that tells usermod to add the specific user to a group.
- The job of the -G flag is to specify the name of the secondary group to which the user will be added.
If what you want to do is change the primary group of the user then you will have to use the -g flag instead. To make use of the usermod, you need the sudo command:
sudo usermod ...
This is because the sudo privileges is required for the usermod. You will know that this makes sense because usermod directly modifies the account of users on a Linux computers.
Linux: Example of adding a user to a group
Assuming you want the “stayinformedgroup” user to added to the “sudo” group on our computer. We can do this with this command:
sudo usermod -a -G sudo stayinformedgroup
This command adds “stay informedgroup” to the “sudo” group. Another you need to know is that no output will be seen for this command
However, if you try to access a file that is only available to other groups, you will see that your permissions have changed. In this case, user “stayinformedgroup” can now access files using “sudo” because he was added to the “sudo” group.
Adding a user more than one group, you can use the same command as above. But you need to separate the name of the group you are going to add the user to. You can add “stayinformedgroup” to the “sudo” and “test” groups using the following command:
sudo usermod -a -G sudo,test stayinformedgroup
with this, it will be that we have added “stayinformedgroup” to two groups. Since our User is now part of the sudo group, he can execute the “sudo” command. This means that our users will have the privilege to run any other Linux command that requires sudo permissions.
We also have access to all files available in the “Test” group.
How to Add a New User to a Linux Group
Sometimes you may want to create a new user and immediately add them to a group. This is where you will need to make use of the useradd command. The useradd command lets you create new users and add users to groups using the -g option.
Let’s say we want to create a new user named sigbusiness and add it to the primary group “coll” and the secondary group “test”. This will be possible if we are to make use of this command:
sudo useradd -g coll -G test sigbusiness
We are required to add “sudo” to the beginning of the command so it reads “sudo useradd…”. The explanation to this is that, like usermod, useradd refers to an account that is already on the file system. These accounts are protected by sudo.
How to View User Groups
The id command allows you to see all the groups a user has access to. This makes it easy to see if you’ve added users to groups in Linux.
The following is the syntax for the id command:
id username
We see this output:
uid=501(stayinformedgroup) gid=20(coll) groups=20(coll) ...
This informs us that “stayinformed” belongs to the primary group named “staff”. We’ve made this output short for brevity, as this command is capable of bringing back a long list of groups, though this also depends on how you have configured your system.
Conclusion
People who make use of Linux should not depend on what they know coding to be, they need to go beyond the basics of programming and the C programming language, you also need to know simple Linux commands, such as adding a user to a group.
The usermod command will provide the path to through which you can add users to groups in Linux. If the user you want to add to the group does not exist, you will need to make use of the useradd -g command.